- zhhivi@hivi.com
Beginner's Guide to Building a Home Studio
How to build a high-quality home studio:
4 key steps

Wanna build a home studio that produces high-quality, catchy recordings and remixes? You got the right place!
In order to achieve the best construction effect, many things need to be considered, from selecting suitable recording studio equipment to applying appropriate room acoustic treatment.
By reading this page and watching our exclusive video, you will learn the basic knowledge and advice needed to create an ideal home studio.
So, let's get started!
1. Necessarily equipment for home studios
A typical home studio setup includes the following equipment:
• Computer: The central hub of audio recording software (also known as DAW).
• Audio interface: Provides high-quality input and output for sound signals.
• Monitor Speakers: A pair of stereo monitors used for reproducing the main sound, allowing you to carefully listen to recordings and mixes in the widest spectral range.
• Subwoofer (optional): A suitable subwoofer is designed to complement your monitor, allowing you to carefully listen to the lower parts of the spectrum and improve the performance of the monitor.
•Professional headphones: used for monitoring when recording with a microphone, as well as supplementary monitoring for mixing.
•Microphone: Tailored to your recording needs, whether for vocals or instruments.
•USB MIDI controller and other instruments: depending on your own voice.

Swan X6pro recording studio monitoring speaker
When budgeting for your studio, remember that the quality of the monitoring speakers you use will largely determine whether you can understand the true sound of the recording and mixing. At the same time, it should be remembered that equipment is only a part of the entire process - a good room acoustic environment also plays an important role in creating a high-quality and reliable studio space.
2. Choose your studio
The choice of home studio has a significant impact on sound quality. Here are some key tips:
Choose a rectangular room
Square rooms pose challenges in both sound creation and acoustic processing, as they are prone to generating standing waves (room patterns) due to sound reflection. This standing wave will have a negative impact on the reliability of the listening experience. If possible, it is best to choose a rectangular room with walls made of soft materials such as wood or gypsum board, rather than stone or concrete, as this can reduce the level and effect of sound reflection.
Create a symmetrical setup at the end third of the room
Imagine dividing your space into three equal parts and determining which end of the two ends serves as the front end - where you will place your listening device. When doing so, please avoid any obvious inconvenient ends, such as protruding doors or fixed furniture. Place your monitoring position in the center of the left and right axis lines at the front of the selected room. Considering the position of your desk and the relative position of nearby walls, strive to create a symmetrical listening setup there. All of these operations will help balance the sound field around the monitoring location.


Front to back comparison - from an empty room to a fully functional home studio.
3. System layout and room acoustics
Proper placement of monitoring speakers and subwoofers is crucial, and effective acoustic processing will further enhance the effect, as it can minimize the impact of sound reflection and echo. The specific method is as follows:
Place the monitor near the back wall
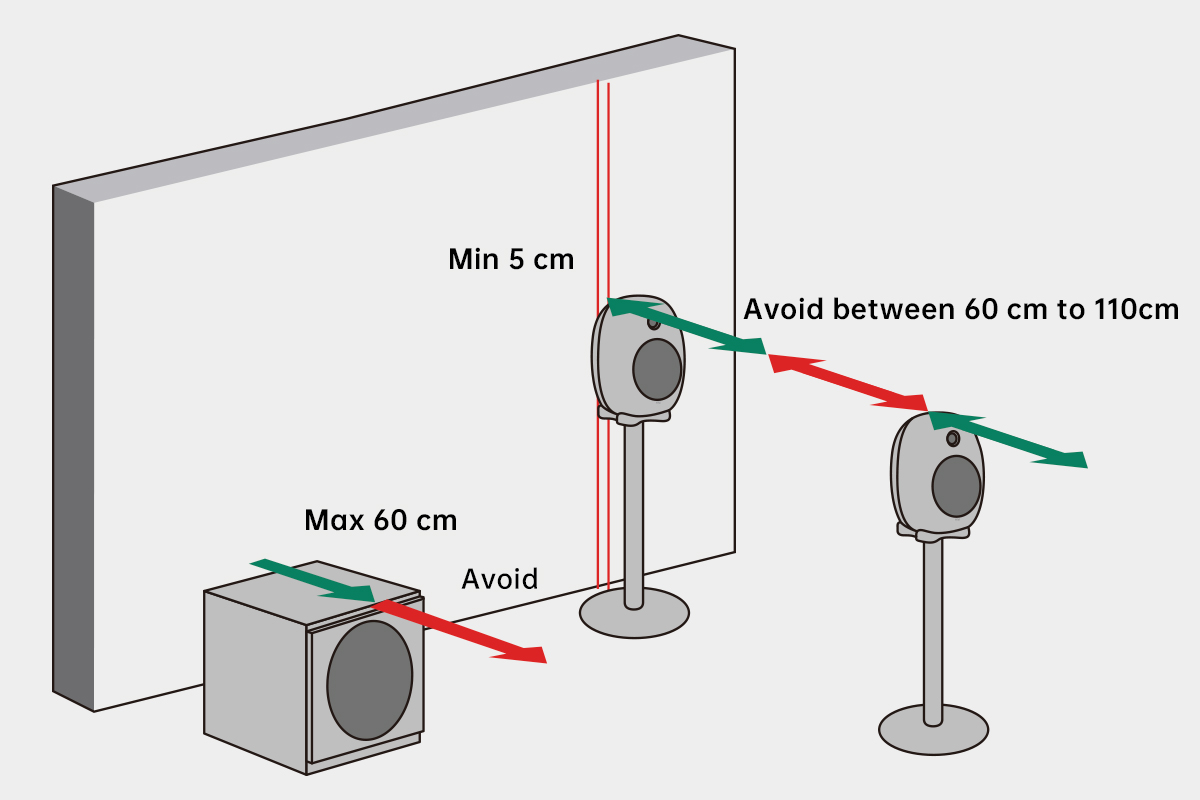
Place the monitoring speaker close to the back wall to avoid eliminating noise reduction effects. Place the monitoring speakers at a 30 degree angle towards the listening position, and maintain equal distances between them and the listening position to form an equilateral triangle.

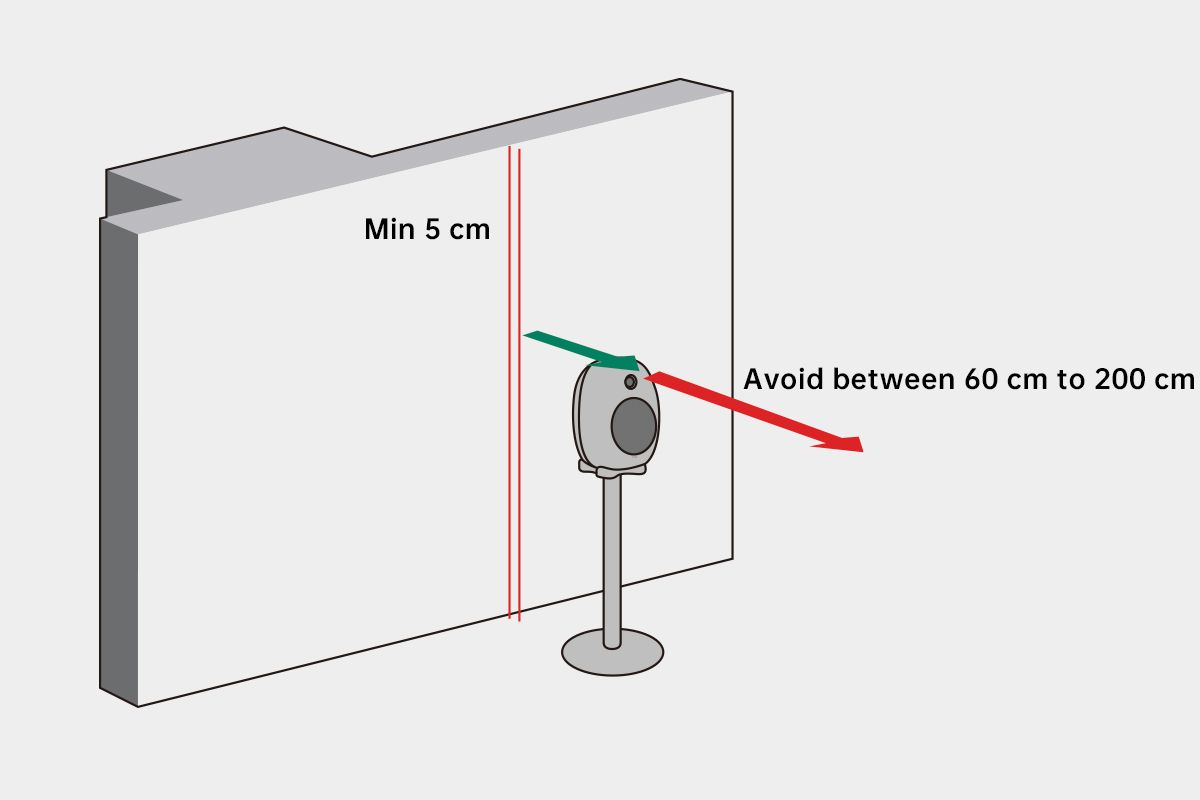
Usually, the distance from the front end of the monitor to the wall should be less than 60 centimeters.

The angle between the left and right displays should be 60 degrees. Here, we can also see that the device is correctly (symmetrically) placed in the front third of the room.
Place the subwoofer near the back wall
Place the subwoofer slightly off center and close to the rear wall to help ensure reliable low-frequency performance.

Typical recommended distance for the wall behind the monitor and subwoofer.
Sound reflection affects reliability
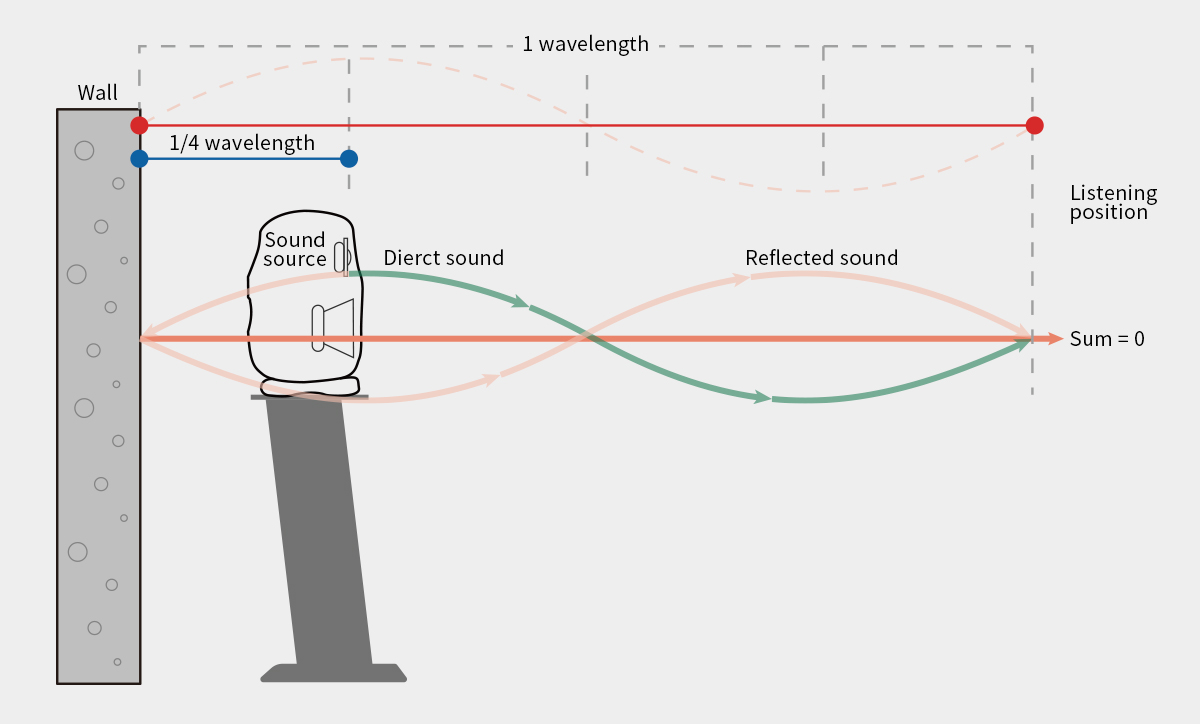
When the audio played by the monitoring speaker is reflected by the wall, it will produce distortion, thereby changing the sound quality of the audio. Reasonably designed and positioned sound-absorbing panels and bass traps can reduce these reflections, helping to preserve the original characteristics of the sound emitted by the monitoring speaker. Thick sound-absorbing panels help absorb low frequencies, while thick curtains, carpets, and carefully arranged soft furniture help control high frequencies.

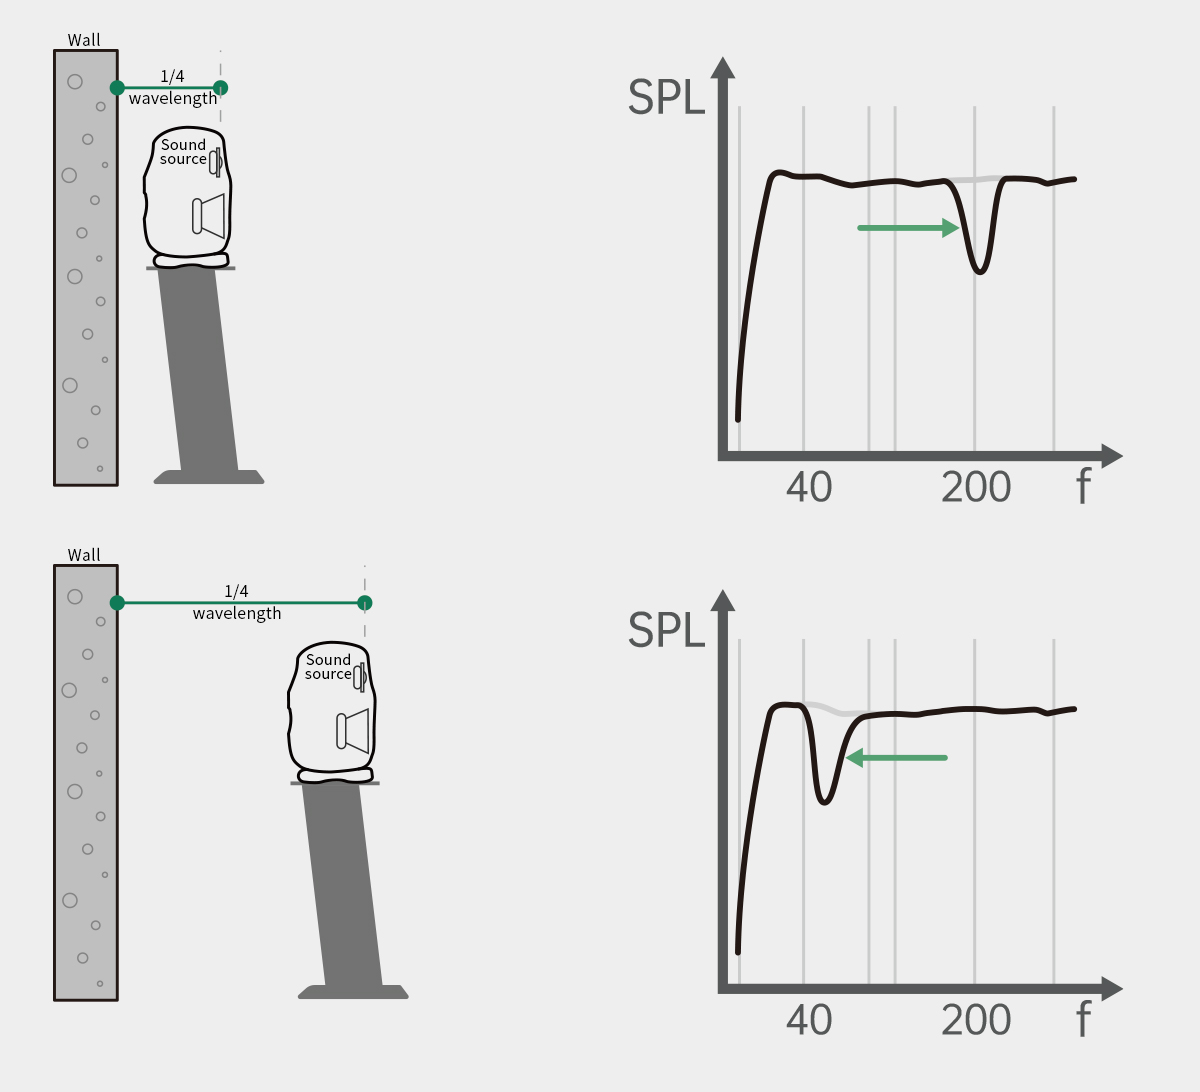
The distance between the monitoring speaker and the wall has a significant impact on sound quality. Changing this distance will directly affect the tone of the sound.

If the monitor or subwoofer is too far away from the wall, it can cause reflection from the back wall, reducing the perceived low frequency level, and cannot be properly resolved through playback adjustments.
Bass is the most difficult thing to do well
Disturbing standing waves typically appear at low frequencies. Once standing waves appear, it is difficult to believe the sound heard and make the correct mixing decision. A rectangular room constructed with soft materials and, where possible, adding bass traps can be helpful. Using a subwoofer is also highly beneficial as it allows for better control and optimization of low-frequency reproduction.
It is also important to pay attention to the bass level in the room. Low frequency is omnidirectional (emitted in all directions), and when a speaker or subwoofer approaches any type of solid wall, the low frequency will naturally increase, thereby enhancing the perceived bass level. This effect is better than placing the speaker or subwoofer away from the wall, as simply adjusting the low-frequency playback level of the speaker or subwoofer can easily compensate for the enhanced bass. Attempting to compensate for low-frequency cancellation (caused by the speaker or subwoofer being too far from the back wall resulting in reduced or missing bass) by increasing the bass playback level is ineffective.
To help manage sound reflections, many monitors and subwoofers are equipped with easy-to-use DIP switches that allow for easy manual adjustment of their frequency response.
4. Maintain an open mind and constantly improve
Creating an ideal home studio is a process, so you may need to:
• Reevaluate the space using acoustic tools: Use practical tools to measure, understand, and improve the acoustic performance of the room before and after renovation.
•Upgrade acoustic treatment: As you continue to explore, you may be able to free up more budget to improve the acoustic treatment of your room. These may be larger sound-absorbing materials or thicker panels to improve low-frequency control, which are often difficult to obtain when you first create a home studio.
•Add comfortable and inspiring items: Create an atmosphere that inspires creativity and makes your studio more attractive. High quality recording studio tools are essential, but other elements such as personalized decor, ambient lighting, ergonomic furniture, and precious instruments can also truly help ignite your passion for audio production.
Use your creativity
That’s it! Now you have mastered the basic knowledge of how to create a powerful home studio and have a reliable monitoring system to help you efficiently record and mix!

